 On the second morning of our trip I awoke to the sound of vigorous drums, which I soon realised was pelting rain. Outside, the line between sky and ocean was blurred and the patch of rocky beach we occupied was flooded. Inside, everything was damp from humidity - our clothing, the bedding, our faces. We had known that the forecast promised intermittent rain, so this was not a surprise and we didn't despair. We were not planning to cycle every day; we had loads of other things to do. We would see.
 But as we drank coffee, the rain appeared to let up. Things were looking good - picturesquely stormy, but calm. It looked as if the downpour had exhausted itself in the course of the night and we decided to set off on our bikes after all, going along the coast for a manageable distance.
The ride started out fine. We made our way up a winding hill, past ominously abandoned beaches. Moody skies hung low over a dark gray ocean. The empty roads were promising. There was only a mild drizzle and we agreed that if things stayed like this, it would be even better than sunny weather - cooler, and less crowded. After cycling for a bit it grew humid and I removed my rain jacket, stashing it inside the handlebar bag. Two minutes later, the skies opened up. There was no build-up; it was as if someone opened a floodgate.
Instead of turning back we persisted, hoping the rain would eventually ease up again. But it only intensified. The amount of water was unbelievable, even compared to the many other times I've cycled in the rain. Visibility became non-existent, with everything turning gray and liquidy. The roads became flooded and soon I was cycling with my wheels partly submerged in water. Roads are terrible in this area, and even on a dry day it is a task to navigate around potholes. Now that they were invisible underwater, I could neither anticipate nor avoid them. My bike bounced violently over ditches at high speeds. This felt distinctly unsafe, especially on curvy descents. On a bike with narrow tires, the ride would have been simply impossible for me.
The coastal road was narrow and winding. As I tried to maintain a consistent line of travel, motorists sped past us, well over the posted speed limit, sending sprays of yet more water in our direction. I had my lights on and could only hope I was visible to them. My jersey - which had started out a bright crimson - was now a dark, dull brown. There are a few tricky spots on this route, where several roads merge on a twisty downhill - so that one must resist picking up speed and be prepared to brake instead. At these instances it became frighteningly apparent that my brakes did not work well under such conditions. I suspended disbelief and did my best, feathering the brakes and trying not to have a panic attack. Climbing up a flooded road while bouncing over potholes was horrifying as well.
Despite my best efforts I found this type of cycling too stressful to enjoy. I couldn't see where I was going, let alone anything resembling scenery, and frankly I had nothing to prove. This was meant to be a pleasant trip and not an endurance contest. I signaled to the Co-Habitant that I wanted to turn around, and we did - making our way back through the unrelenting downpour the same way we came. Before returning home, we took a detour and stopped at a hardware store to pick up oil for the bikes - later spending a great deal of time wiping sand and debris off of them and treating the components to prevent rust - which can form alarmingly quickly in a coastal environment. My wool cycling clothing took a day to air-dry, and my shoes are still soaking wet.
Though I know others enjoy the challenge of riding in this kind of weather, this is not an experience I care to repeat unless absolutely necessary. It is one thing to cycle in the rain, but a trip along the coast in a continuous and forceful downpour - with the roads flooded, visibility poor, and the wind assaulting my face, body and bike with sandy salt water - is not something I can justify, both in terms of safety and in terms of its detrimental effect on equipment. Hopefully there will be better weather ahead... though the forecast remains ominous!
 One of my favorite things to do while sitting at the beach, is to watch the surfers.


 This Fall I've been sick a lot, so I am using the downtime to knit. After making a couple of skirts, I moved on to a special project: hats and scarves specifically designed to resist the cold and wind while cycling.
 While it may seem that any hat and scarf should be sufficient for this, last winter I discovered that this wasn't so. Store-bought knits can be a mixed bag in terms of how well they work, even if they "look" warm and cozy. So while making my own, here are some criteria I've come up with that may help as you're winter shopping.
 1. Adequate coverage
 As for scarves, they can often come loose and unravel, or at least slip in a way that exposes your throat to the wind while cycling. If you have found this to be a problem, consider getting what is called a cowl neck, or a neck warmer instead. This is basically a thick, knitted turtleneck, without a sweater attached to it. You slip it on over your head and tuck the bottom under the collar of your coat. Unlike a scarf, it stays put and provides adequate coverage - even when cycling against the wind.
 2. 100% wool
 Some might worry about wool feeling scratchy agains their heads or necks, but today it is easy to find wool with soft textures - wool that feels cotton-like or silk-like. While cashmere is nice, it is not necessary if you can't afford it. To me, peruvian alpaca has a very pleasant feel to it, and it is fairly affordable.
 Even a gauze-thin wool hat can be surprisingly effective against the cold and wind while cycling. I made this one when it was still summer-ish, but it works well even in November.
 2. Dense stitching
 Cycling in the cold is a special challenge for knitted hats and scarves, because they need to remain effective when you are moving against the wind at 10-20 miles per hour.I own lots of knitted accessories, but when the temperatures fell to below freezing last winter, I discovered that only a few of them truly kept me warm.Pieces that provide full coverage of the ears and throat, are 100% wool, and are densely knit, will be up for the job where others fall short.
 4mm cord easily fits into the factoryumbilical hole if you want a lower profile umbilical attachment.
 Cord and pommel in place at the medium setting..but not bolted down yet. It had better be right when you put this all together because you won't be moving it again other than to replace it after you have added the epoxy bedding material.
 Easy to see here the tiny bit of pommel I groundoff to fit an umbilical clip cord if that is something you want to do while you are working on the shaft. The new pommels are aneasily replaceable part and inexpensive.
 In the pictures below I am holding the pommel so you can look down into the shaft's slot and see the single steel engagement tooth. I laid a thick layer of Steel Bed Epoxy into that slot which covered the single steel "tooth." Putting your chosen bedding compound-epoxy here will help prevent the shaft end of the tool from being strippedout by excess movement of the pommel in hard use. The idea is to reinforce the steel notch pin in the pommel by addingsome support with the steel based epoxy in the other adjustment slots.
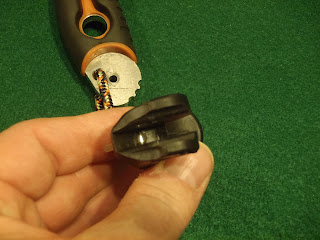 If you want to run umbilicals Petzl has made that easy now by the hole in the shaft able to take4mm or 5mm cord. Easy to grind off the back end of the pommels and thankfully not change the feel on the grip. 4 or 5mm cord will generally be about the same strength as the commercial umbilicals like Grivel's and BD's.

 It is indeed that time of the year. I was hoping for some rebate luck but looks like this year will be a dry one with no change, but maybe I am wrong with my math. We will see. My suspicions are there's more blue envelopes coming down to visit my mailbox.
 This year the Belastingdienst (Dutch Tax Department) is penalizing tax payers who do not file their taxes on time. I am cramming!